 |
 |
 |
 |
 |
 |
|
Installing your Solid Fluid applicationIn the previous section on preparing for the installation we saw the three files included in the application download. We've seen how to prepare the machine for installation on Windows XP, now we're going to do the actual install. There two ways to invoke the the installation, either setup.exe, or the .msi file. The actual installation is contained within the .msi file. In most circumstances it won't make any difference if you double click either the .msi file or setup.exe. The latter performs some checking, and in addition, if there is any software that the installer itself might need, then it will deal with getting it. In general, setup.exe is the old way, and the .msi file the new way. At the moment, June 2009, on any operating system that Microsoft publicly supports, both work. On older machines (pre Windows XP) you may only be able to use setup.exe, and in future you may have to use the .msi file. Take your pick of installer, and double click it. On Windows Vista, and later machines the following dialog may appear; 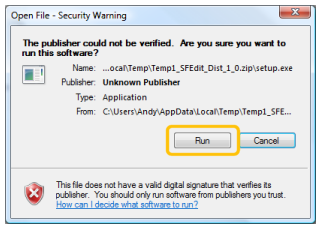 This dialog indicates that our software is not signed. Signing software, avoids this warning being displayed but requires us to pay a third party for a special electronic certificate. This certificate might underwrite the quality and security of our software. The most reliable thing that such a certificate does, is allow you to determine that the software actually came from us. We take the security of data that you provide us seriously, and have the corresponding security certificates to protect it, wherever it might be vulnerable. We feel, however, that this same kind of measure applied to software, simply pushes up the cost. From an ethical perspective we cannot, nor do we wish to, force you to install our software. This decision must be yours alone. If you have any doubts about the software you downloaded compromising your computer, and it's security, we would have to recommend that you don't install it. We ought to point out that our software works in conjunction with our own electronic licensing scheme. We feel that it is fairly unlikely that someone else's software will work with one of our licences, and by this means it will be possible to determine that you do actually have our software. Notwithstanding, it is also possible that you may have someone else's software, and licence. Should that be the case, then any issues would properly be addressed with them. If you wish to install our software, click the run button hilighted in orange. Assuming you choose to proceed with installation, you will be presented with the first of the setup dialogs;  Note the logo, and the copyright notice, and click next, outlined in orange. 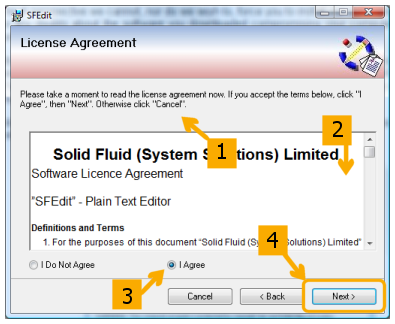 Assuming you can accept the licence agreement, select "Agree" and click next. 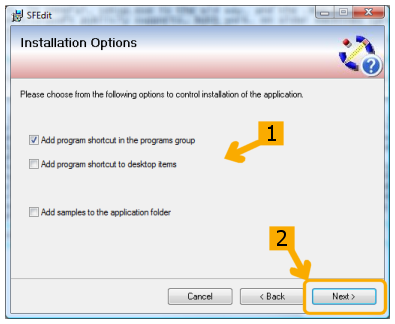 Options are offered in this dialog. These are outlined as follows;
We would recommend that you choose either or both of the first two listed options, but not niether. Clearly, if you don't select either it's going to be difficult to find the installed software when you wish to run it. Once you've made your choices click next. 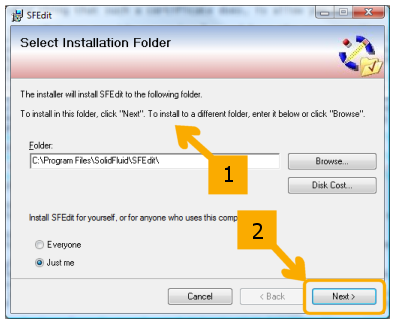 If you need to change the installation path, then here is the place to do it. For most people there is little need to change this detail. Once satisfied, click next. The installer will report that it is ready to begin installation. Assuming you're satisfied up to this point, click next and the installation process will begin transferring files from the .msi installer file to your computer. If you're running Windows Vista or later, the installer may ask you to provide administrative authority before the files are transferred. If this happens, either click allow, or get a system administrator to provide his credentials to allow the installaton to complete. Once the installation has completed, you should see the following dialog;  The "Register Now" button will open an internet browser window at a landing page for the application you are installing. This page has further instructions to assist with obtaining and installing a licence for your new application. On this page you will find the licensing options for the application, and it is here that you can buy a licence. If you purchased the software as a box product, then you will already have a licence packaged with the installation, and you will not need to use the registration button. If you obtained the software online, then you will need to use the registration button in order to obtain a licence. In this case push the registration button and minimise the new browser for use later. Then, just complete the installation process by clicking next on the installer until it tells you it has completed. If you purchased your software as a boxed product then you can find instructions for the installation of your bundled licence here. If you obtained the software online you will need an "InstanceId", which locks the software to your particular machine. We offer these licences at significantly reduced cost. Unless you are buying a more expensive professional licence which does not require the "InstanceId", you will need to run the application you have just installed, in order to obtain it. |


Copyright © Solid Fluid 2007-2025 |
Last modified: SolFlu Thu, 24 Sep 2009 17:07:07 GMT |