The first step on receiving your new SPA3102 is to get access to the unit through the web based interface. On the face of it this is a trivial task, and for certain configurations I would imagine that it could be. I have a combined modem/router and this means that the SPA3102 must be connected to the router behind NAT and the firewall. This arrangement makes configuration more complex.
The SPA3102 has two ethernet ports. Users on the WAN port (Internet) can be physically prevented from accessing the web based configuration pages. The idea is that in a non NAT/Router configuration the phone side of the unit is directly on the internet, and the config web server is only on the local side of the unit. One can then use NAT and port mapping inside the SPA3102 to act as a firewall for the local network. By default the unit is configured for this mode of operation.
If you're using the unit in this default mode then you can almost ignore the rest of this page. You will still need to connect and gain access to the unit. I've not used the unit that way so all I can say is that you may find some clues here. For convenience I'll talk about WAN and LAN (Wide & Local Area Networks respectively). On the unit the WAN port is marked "Internet" and the LAN port marked "Ethernet".
To use the unit inside an existing router, it has to be reconfigured to allow the WAN port to be used on the actual LAN. This allows the phone ports access to the Internet. To make this change you must access the unit's config web server page which is only available on the LAN port. The SPA3102 internal Router assumes an IP address of 192.168.0.1, and it is likely that this will conflict with the IP address of your existing router. Not only this but the default configuration of the router is likely to want to allocate IP addresses, and the existing router is probably not going to like this.
To avoid further problems, what is needed is a direct connection between a computer with a web browser and the LAN port of the SPA3102. Overall this seems trivial. Importantly, the LAN port is configured as a terminal. Since the computer will also be a terminal you'll need a special Cat5 crossover cable to make the link work properly. These can be bought, or made, but it is important to keep this cable separate so that it does not cause a problem in future. A crossover is easily confused with an ordinary cable. Perhaps tie a label to it.
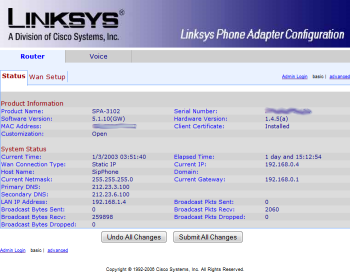
Disconnect the router from your computer and connect the SPA3102 by it's LAN or "Ethernet" port, to your computer instead. Once this is done you should be able to access the configuration utility by opening a browser window and typing the URL "http://192.168.0.1". If all is well you should get a page which looks something like the following one.
In the top right, and bottom left, are the belwiderment filters! You'll need to select the "Admin Logon" option and then the "Advanced" option to ensure that you can see all of the available configuration options. It's certainly pain to run with all this additional information, but I'm sure that I spent time trying to find a control that was hidden by failing to select these options. From now on I'll just assume you have these options set, but you'll need to check them any time you log back on to the unit.
Another thing to bear in mind, is to keep a list of options names that you're working with. Typically, if you're experimenting, you'll be working with the interaction of options on different pages, and a fast way to navigate is to use the find capability of the browser.
The first configuration task is to specify a new WAN IP address, and enable the web configuration interface on the WAN port. Once done you'll be able to plug the SPA3102 into your router without any fear of mayhem.
Select the WAN Setup sub-tab of the Router tab. You may want to configure the SPA3102 for DHCP. I'd recommend that you don't, although I've not tried it that way. The least hassle route is to specify a static IP address, but this might require that you adjust the DHCP server on your real router to allow a range of static IP addresses. I always run that way, so I didn't need to make any changes to the router. If you need to do this, do it now, before making any changes to the SPA3102.
The following options need to be set;
Internet Connection Settings
Connection Type:
Static IP
Static IP Settings
Static IP:
Your chosen IP (unallocated) address for the unit
NetMask:
255.255.255.0
(probably)
Gateway:
The IP address of the router
Optional Settings
Primary DNS:
Your ISP provided primary DNS server IP address
Secondary DNS:
Your ISP provided secondary DNS server IP address
Primary NTP Server:
(optional) The IP address of a time server for accurate timestamps in the log
Remote Management
Enable WAN Web Server:
Yes
Don't hit the submit all changes button yet, we still need to reconfigure the LAN port before applying the changes. Select the LAN Setup sub-tab of the Router tab, and set the following options;
LAN Network Settings
LAN IP Address:
192.168.X.1
Assuming that you previously chose 192.168.0.3 as the Static IP, choose X to be 1 (i.e. different from 0)
Having worked through these changes, you can now push the submit changes button. Wait while the lights on the unit flicker. The web page will say that it's going to reload. It can't because the unit is now on a different address. Once you're satisfied that the changes are saved inside the box, (around 20 seconds) disconnect it from the crossover cable, store the crossover for safe keeping, and reconnect your computer to the router.
You can now connect the WAN port (marked Internet) to your router. You should be able to access it at the address chosen in the Static IP field. If this doesn't work check that your router agrees that there is no IP conflict with the static IP you assigned. Also check the power and that you've not connected the unit to the router with the crossover cable. If it doesn't work something must have gone wrong, and you'll have to reset the unit. To do that you're going to need to disconnect the SPA3102 from the router, and connect an analogue telephone to the FXS port (marked Phone). Once reset run through the procedure above once more.
To reset the unit, use the RJ11 to BT Female connector mentioned at the bottom of the previous page to connect the analogue phone. Once connected, power up the unit, and lift the phone handset. Don't wait for a dial tone, just dial **** and wait for the prompt. Linksys woman will let you know she's inside the box, by speaking to you! Dial 73738 and when asked dial 1 to confirm. You can now get back into the box using the crossover cable, connected directly to a computer.