 |
 |
 |
 |
 |
 |
|
Making the PCB (Part 2)We've seen how the blank is cut out, how it's keyed, and cleaned, now it's time to look at applying the toner to the blank. To do the toner transfer, we'll need a sheet of the gummed paper. I always think it a shame to waste, since if you make it; it takes ages, and if you buy it; it costs a pound a sheet. To this end, I usually only put a small piece through the printer, even though a whole sheet would go. I described the lengths to which you should go, in order to keep the copper surface clean. The same is obviously true of the gummed paper. The gummed paper is perhaps worse, although the copper will gradually oxidise where you touch it, grease is more of a problem than oxides. With the gummed paper, the moisture in your fingers will upset the water based gum, and introduce grease. The flat side of the gummed paper is fine to touch. I recommend holding the gummed paper in a gentle curl, on the non-gummed side. Because of the sensitivity of the gummed paper, I would also recommend keeping it in a Ziploc bag. Even in free air the humidity of the environment will get sucked up by the gummed paper. This is to be avoided. Wherever possible keep the gummed paper in its bag, sealed with a minimum of trapped air inside. Preparing the artworkTo prepare for the toner transfer, I first print another full scale artwork on the printer, just on ordinary paper. As the artwork comes out of the printer, I grab it by the first emerging front edge. I don't let go, until I've written on the artwork side, by the edge I'm holding, the word "FRONT". We're going to pass this piece of paper through the printer again. By marking this edge, there is no possibility of trying to put the sheet back through the printer, the wrong way round. 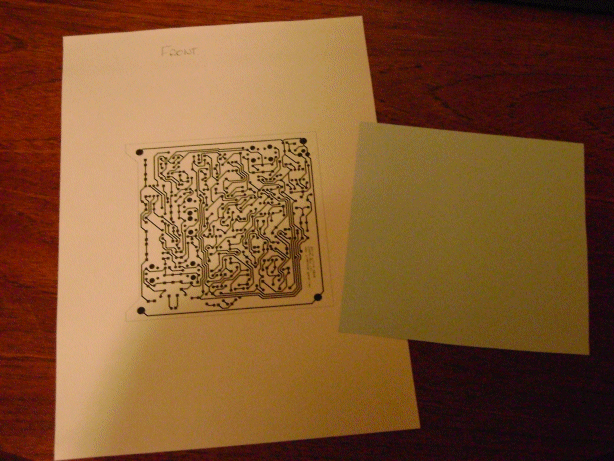
Once you have the printout, cut a piece of the gummed paper suitable to completely cover the artwork on the page. In addition, allow some extra gummed paper along one edge of the artwork. Leave perhaps 1" (25mm) from one edge, and 1/4" (6mm) on the other three sides. Using sticky tape, position the gummed paper over the artwork. The gum side should be up, and the tape should be along the edge closest to the page edge you marked as the front. Only one piece of tape should be used, and it must be at the front, or the flap of gummed paper will get caught in the printing rollers. If you tape more edges than one, you risk damaging the artwork, when the underlying guide page is removed. Removing the tape afterwards can be tricky if the tape is too close to the toner. When you peel the tape back it can pull the gummed paper with it. Potentially, it damages the precious toner image. In an ideal world the one edge with the biggest margin should be at the front, which solves both problems. It is not always possible to use this front edge, especially if it's not straight. Printing the artworkFeed the combined sheet with flap back into the printer input tray. Make sure that the front is at the front, and that the page is the correct way up. If you're not sure which way is up, mark a blank sheet with a marker, and feed it through the printer, as a test to find out which way is up, beforehand. Run the artwork with the flap sheet through the printer, and if you're lucky, you should get a good black image on the gummed side of the gummed paper. If it didn't work out go again until it does. I cannot stress the importance of a really strong toner image. Sadly, it's a one shot operation. If the image is not good enough first time you'll have to replace the gummed paper. If the toner cartridge is old, consider getting a new one just for the PCB's. You can still use the old one, if it's good enough for normal printing, but the denser the toner, the better the board will come out. Assuming it worked out, all you have to do, is remove the tape, and throw the guide sheet away. Take the gummed paper and working with the front edge, score the gummed paper along that board edge. Whilst scoring, avoid finger contact with the toner / artwork area. The correct edge to score is the one with the big margin. Have that edge toward you when you score, and have the straight edge between you and the toner. Doing it that way the straight edge never goes over the toner, which must be kept clean. The score should be light. Just once, all we're doing is putting in a folding guide. Set the straight edge and the knife aside. Get the laminator warmed up, and fold the gummed paper up vertically along the score. Place the board blank over the toner image, copper side down. Push the edge of the board against the fold in the gummed paper. Satisfy yourself that the blank board edge is accurately aligned with the board edge on the toner image. Once you're satisfied with the alignment, push hard down on the board pressing it into the gummed paper below. Fold the vertical piece of gummed paper over the top of the board. Be sure to crease the fold tightly on the top edge with your finger nail. Transferring the artworkHolding the board tightly between thumb and finger, gripping where the gummed paper sandwiches the board, go to the laminator. Hopefully it's warm, and the ready light is on. If not, wait for the ready light. The first pass of the assembly through the laminator is critical. It must stick on the first go, because if it doesn't it can move, and damage your artwork. 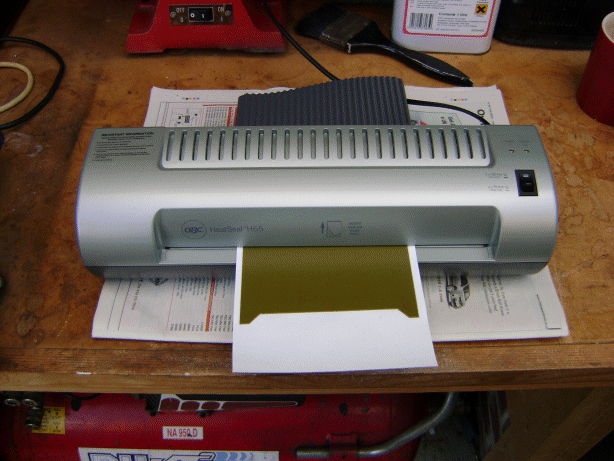
Taking care not to allow the blank to slip in the gummed paper, present the folded edge to the laminator as soon as it is hot. If the ready light goes out, don't panic. This often happens. You will find that the gummed paper sticks first time. I don't recommend testing that, but it does. To be sure about the adherence, I recommend passing the assembly through the laminator, perhaps five to eight times. Less is better, but too few is no good. Too few, and areas fail to stick. Too many and the toner melts and goes runny. 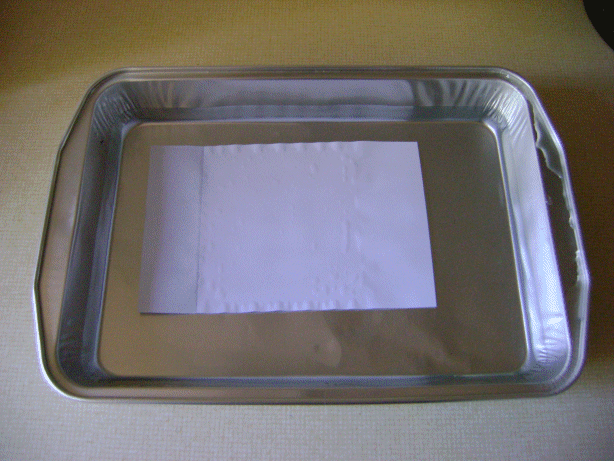
Don't try to peel the paper off under any circumstances. Set the assembly to one side, and prepare a bowl of water big enough to immerse the whole board. Slide the assembly into the water with the paper on top. Let it sink under it's own weight. If it floats on the surface tension of the water, just nudge it, until it sinks. Once it's done, the paper will float up off the board. If you have the professional paper this will take less than twenty seconds. The board will be left at the bottom of the bowl. It is at this stage you can confidently pull the gummed paper away, and put it in the bin. Dry out the board with toilet paper or kitchen roll. Just dab it until it's dry. There's no harm to the toner in rubbing it, except that the toner will pull the soft wet paper away, and you'll be left with pieces of soggy paper on the toner artwork. We don't want that because we it to be "lint free" for the next stage. Once the board is dry it should look as below. At this stage it is safe to wipe your finger over the toner, just to make sure it's fast with the copper. You will want to keep the board clean, but the next stage is not nearly as sensitive to grease, damp or oxides. 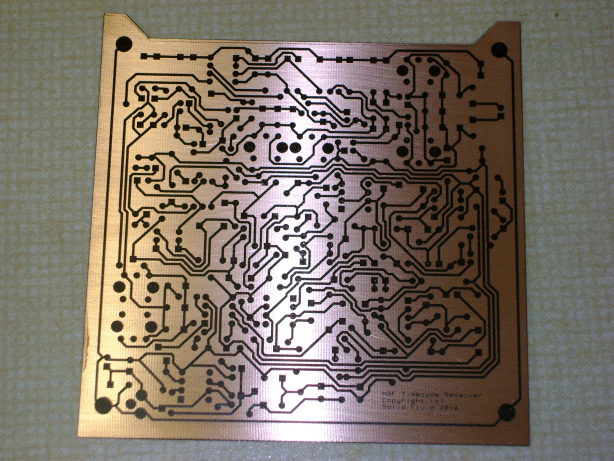
If you have any problems with the fastness of the toner, you'll have to go right back to the cleaning stage. Beforehand you can save yourself some effort, using Acetone to simply wipe any of the toner image that did stick onto a soft cloth. Even though you have removed the toner with the Acetone, it's worth going through the abrasion again, because you'll know that any acetone has been completely removed. You might notice in the image above, that there must have been a small misalignment, between the gummed paper, and the blank board edges. The artwork edges actually appear on the copper. This often happens. If you're doing a double sided board, such alignment is critical, on a single sided board it's less so. To align a double sided board, you really need to work with an oversized copper clad blank. Schemes for double sided boards and finishing upYou can put fiducial marks on the artwork outside the board edges, or perhaps spare areas of the actual board. Another way is to use the actual mounting holes for the board. From one side you drill the blank to the "fid marks" on the template sheet, and then the gummed paper can be aligned to these holes, from both sides using drawing pins. Once you have alignment, you can use tape to hold the gummed paper in place whilst it goes through the laminator. If you use fid marks, be sure to use three, and be sure that they make a scalene triangle. That way there's only one correct way to make the alignment, and the paper won't get wrinkled. Because of our non-critical misalignment, now is the time to simply run around the edges of the board and remove the toner where the board edge marks have erroneously appeared. Do this with your knife. It could be removed with liquid (acetone), but it runs, and you don't want to damage the good toner. Using a knife will give an appreciation of just how resilient the toner actually is to mechanical abrasion. Now we've got a complete transfer of the artwork, we'll move on in the next page to preparation for etch and the actual etch it's self. |


Copyright © Solid Fluid 2007-2025 |
Last modified: SolFlu Sat, 03 Jul 2010 00:18:38 GMT |